How to Replace a Boat Engine Impeller
September 26, 2025 |
By Ali
Your boat’s impeller might be a small rubber component, but it plays a massive role in keeping your engine running smoothly. This vital part circulates cooling water through your outboard motor, preventing catastrophic overheating that could leave you stranded on the water with a seized engine.
Replacing an impeller isn’t as complicated as many boat owners think. With the right tools and a systematic approach, you can tackle this essential maintenance task yourself and save money on marine service costs. This guide walks you through everything you need to know about impeller boat engine replacement, from identifying warning signs to completing the job safely.
What Is a Boat Impeller and What Does It Do?
A boat impeller is a flexible rubber component with multiple vanes that sits inside your outboard motor’s water pump housing. It functions like a centrifugal pump, drawing raw water from outside the boat and circulating it through the engine’s cooling system.
The Role of the Impeller in Cooling
The impeller creates suction that pulls water through the engine’s intake. As it spins, the flexible rubber vanes bend and straighten, creating chambers that draw water in and push it through the cooling passages. This constant flow of fresh water absorbs heat from the engine block and cylinder head.
How It Maintains Engine Temperature
Raw water flows through dedicated cooling channels in your engine, absorbing heat before being expelled through the exhaust system. The impeller maintains consistent water pressure and flow rate, ensuring all engine components stay within safe operating temperatures even under heavy load conditions.
What Happens If the Impeller Fails
When an impeller fails, water flow drops dramatically or stops entirely. Without adequate cooling, engine temperatures skyrocket within minutes. This can cause warped cylinder heads, blown gaskets, or complete engine seizure—repairs that often cost thousands of dollars.
What Are the Symptoms of a Bad or Failing Impeller?
Recognizing impeller problems early can prevent expensive engine damage. Watch for these warning signs during your next boating trip.
Reduced or No Water Flow
Check your engine’s telltale stream—the small stream of water that exits near the engine. A weak stream or no water flow indicates impeller problems. The stream should be steady and strong when the engine runs at idle or higher RPMs.
Engine Overheating Warnings
Modern outboards have temperature warning systems that alert you to overheating. If your temperature gauge reads high or warning alarms sound, shut down immediately and check for impeller issues. Steam rising from the engine is another obvious overheating sign.
Noise and Vibration Issues
A damaged impeller can cause unusual vibrations or grinding noises from the lower unit area. You might also notice the engine running rougher than normal, especially at higher RPMs when water demand increases.
Visible Damage During Inspection
Remove the engine cowling and inspect the impeller housing if possible. Look for rubber pieces in the water intake or signs of metal shavings that indicate impeller deterioration.
How Often Should You Replace a Boat Impeller?
Impeller replacement frequency depends on several factors, but most marine mechanics recommend following a proactive maintenance schedule.
Manufacturer Guidelines
Most outboard manufacturers suggest replacing impellers every two to three years, regardless of operating hours. This preventive approach helps avoid unexpected failures during peak boating season.
Factors That Affect Lifespan
Operating conditions significantly impact impeller life. Boats used in sandy or debris-filled water wear impellers faster. Extended periods of engine operation without adequate water flow—like flushing on dry land—can also damage the rubber vanes quickly.
Seasonal and Preventive Maintenance
Many boat owners replace impellers during spring preparation or fall winterization. This timing ensures reliable operation during the upcoming season and prevents mid-season breakdowns.
What Tools and Parts Do I Need to Replace an Impeller?
Gathering the right equipment before starting makes the job much smoother and prevents delays when you’re halfway through the project.
Essential Hand Tools
You’ll need a socket set, combination wrenches, flat-blade screwdrivers, needle-nose pliers, and a torque wrench for reassembly. A gear puller may be necessary for some outboard models to remove the impeller housing.
Replacement Kit Components
Purchase a complete impeller kit that includes the impeller, housing gasket, O-rings, and any seals specific to your engine model. Kits ensure you have all necessary components and maintain proper sealing.
Lubricants, Sealants, and Safety Gear
Marine-grade lubricant helps install the new impeller without damaging the vanes. You’ll also need marine sealant for gasket surfaces and safety glasses to protect your eyes from debris.
Can I Replace a Boat Impeller Myself?
Most boat owners with basic mechanical skills can successfully replace an impeller, but honest self-assessment is important.
Skill and Mechanical Knowledge Required
The job requires moderate mechanical ability, including using hand tools, following torque specifications, and understanding basic assembly sequences. If you’ve never worked on engines before, consider having a professional do the first replacement while you observe.
Safety Precautions to Consider
Always disconnect the battery and remove the propeller before starting. Support the engine securely if you need to tilt it up for access. Work in a well-ventilated area and wear appropriate safety equipment.
When Professional Help Is Better
Complex outboard designs or limited tool access might require professional service. If you discover additional problems like worn pump housing or damaged seals, a qualified marine technician can address multiple issues efficiently.
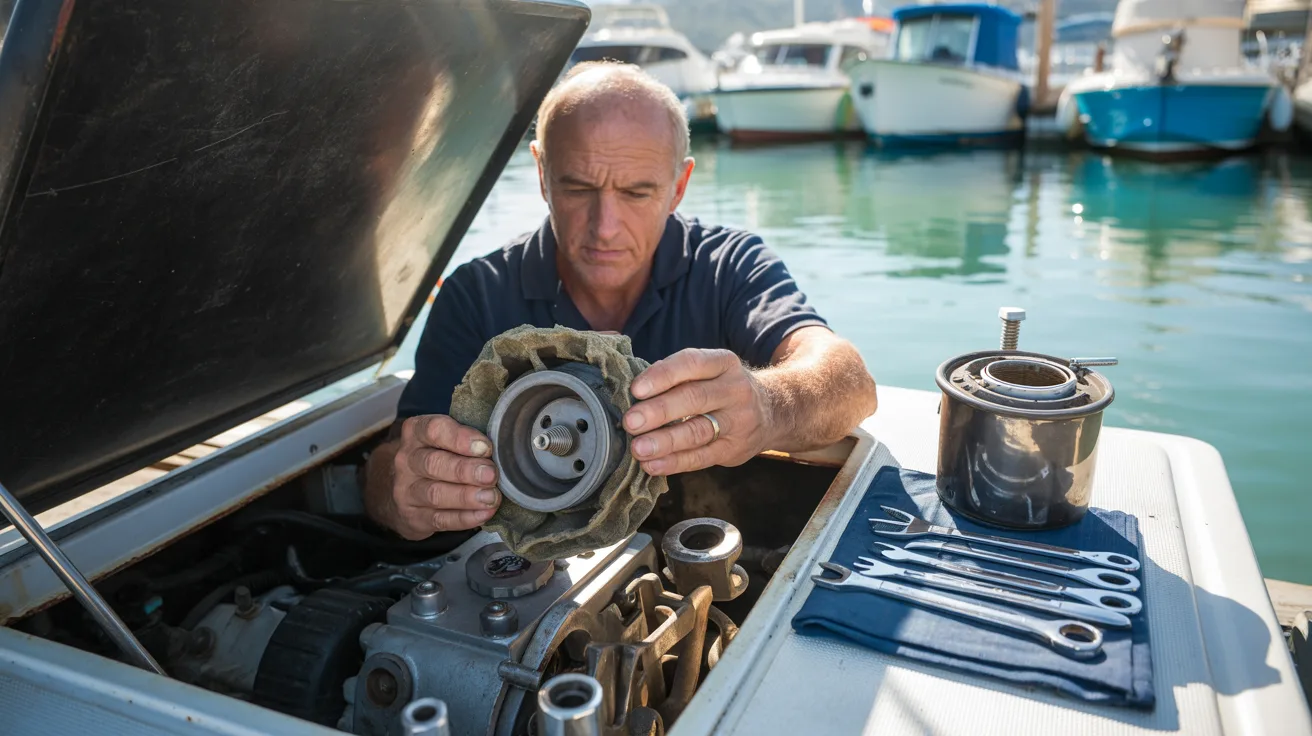
What Is the Step-by-Step Process for Replacing an Outboard Impeller?
The replacement process varies slightly between manufacturers, but these general steps apply to most outboard motors.
Disconnecting the Lower Unit
Remove the lower unit by disconnecting the shift linkage and unbolting the unit from the engine bracket. Some models require draining the gear oil first. Mark the shift rod position to ensure proper reassembly.
Removing the Water Pump Housing
Unbolt the water pump housing from the lower unit. Note the position of gaskets and seals as you disassemble components. The old impeller will likely come out with the housing or remain on the drive shaft.
Installing the New Impeller
Lubricate the new impeller vanes and carefully work it onto the drive shaft. Ensure all vanes fold in the correct direction—usually clockwise when viewed from above. Install new gaskets and seals according to your service manual.
Reassembling and Testing
Reverse the disassembly process, applying marine sealant where specified. Torque all bolts to manufacturer specifications. Before launching, test the repair by running the engine with a garden hose attached to the water intake fitting.
What Is the Step-by-Step Process for Replacing a Stern Drive/Inboard Raw Water Pump Impeller?
| Step | Task | Key Details & Tips |
|---|---|---|
| 1 | Preparation & Safety | – Disconnect the battery to prevent accidental engine starting. – Close the seacock (if equipped) to prevent water from flooding the boat. – Gather tools: screwdrivers, wrenches, a pulley holder (if needed), a new impeller kit (with gaskets), and lubricant (glycerin or dish soap). |
| 2 | Gain Access & Loosen Drive Belts | – You may need to remove other components (like a serpentine belt or alternator) to access the pump. – Loosen the belt tensioner and slide the belt off the water pump pulley. |
| 3 | Disconnect Hoses & Remove Pump | – Use a screwdriver or wrench to loosen hose clamps on the inlet and outlet hoses. – Gently twist the hoses to break them free from the pump fittings. – Unbolt the pump housing from its mounting bracket. Keep track of all bolts. |
| 4 | Open the Pump Housing | – The pump will have a clear cover or a metal body. Carefully remove the bolts securing the cover. – Tip: Tap the cover gently with a plastic mallet if it’s stuck. Avoid prying with a screwdriver, which can damage the sealing surface. |
| 5 | Remove the Old Impeller | – Inspect the old impeller. Note the direction in which the vanes are bent (this indicates rotation direction). – Use dedicated impeller puller tools or gently work it out with curved picks/screwdrivers. Avoid scratching the pump housing. |
| 6 | Clean the Pump Housing | – Remove all remnants of the old gasket. – Inspect the housing for scoring or cracks. A damaged housing will cause the new impeller to fail quickly. |
| 7 | Install the New Impeller | – Crucial Step: Lubricate the new impeller vanes and the inside of the housing generously with glycerin, dish soap, or water-safe lubricant. – Carefully insert the new impeller, ensuring the vanes are bent in the correct direction (matching the rotation noted in Step 5). |
| 8 | Reassemble the Pump | – Install a new gasket on the cover. – Reattach the cover and tighten the bolts evenly in a criss-cross pattern to avoid warping the housing. |
| 9 | Reinstall the Pump & Reconnect | – Bolt the pump back onto the engine. – Reconnect the hoses and tighten the clamps securely. – Reinstall and tension the drive belt. |
| 10 | Final Checks & Test | – Reopen the seacock. – Reconnect the battery. – Start the engine and immediately check for water flow from the exhaust and for leaks at the pump. Do not run the engine dry for more than 15 seconds. |
Locating and Accessing the Pump
To begin, locate the raw water pump, which is usually mounted on the boat engine in an accessible area. Refer to your vessel’s service manual for its exact location. Disconnect the hoses leading to and from the pump and ensure you have easy access to the impeller housing. It’s essential to have the right tools on hand, including a screwdriver, pliers, wrenches, and marine sealant, before starting the process.
Removing the Old Impeller
Carefully remove the pump cover by loosening the bolts or screws holding it in place. Be sure to keep track of any washers or hardware. Once the cover is off, gently use pliers or an impeller removal tool to extract the old impeller. Take care not to damage the drive shaft or the housing during removal. Inspect the interior of the housing and remove any debris or remnants of the old impeller, as these can obstruct water flow.
Installing the New Impeller Correctly
Before installing the new impeller, lubricate the vanes using soap or a water-based lubricant. This reduces friction when starting the engine. Align the keyway on the impeller with the drive shaft to slide it into position. Ensure the vanes fold in the correct direction (most commonly clockwise when viewed from above). Refer to your service manual if you’re unsure. Replace worn gaskets or seals with new ones to prevent leaks.
Reattaching Components and Testing
Reassemble the pump, securing the cover with bolts tightened to the manufacturer’s torque specifications. If required, apply a marine-grade sealant to bolted connections to ensure a watertight seal. Reconnect the hoses to the pump and secure them with hose clamps. Before launching, test the repair by attaching a garden hose to the water intake fitting. Start the engine and check for proper water flow and any signs of leaks. If all functions are normal, the replacement is complete.
What Common Mistakes Should I Avoid When Replacing an Impeller?
Incorrect Vane Direction
One frequent mistake is installing the impeller with the vanes bent in the wrong direction. This causes improper water flow and can lead to overloading the pump or engine failure. Always confirm the vane direction, typically indicated in your service manual, or observe the orientation of the old impeller before removal.
Reusing Old Seals or Gaskets
Using old or worn seals and gaskets can cause leaks or reduce the pump’s efficiency. It’s crucial to replace all seals and gaskets with new ones during impeller replacement to maintain optimal performance and prevent water from escaping the housing.
Over-Tightening Bolts
Excessive tightening of bolts can crack the pump housing or deform the gasket, leading to leaks or misalignment issues. Always use a torque wrench and follow manufacturer-recommended torque specifications to avoid over-tightening.
Forgetting to Lubricate the Impeller
Attempting to run a dry impeller without lubrication can cause immediate damage as the vanes will wear out against the pump housing. Be sure to lubricate the new impeller thoroughly with a suitable lubricant to ensure smooth functioning and prevent damage during initial operation.
Why Is There No Water Coming Out After I Replaced the Impeller?
If you find that no water is coming out after replacing the impeller, several factors could be responsible. Proper diagnostics can help identify and resolve the issue, ensuring smooth operation.
Impeller Installed Incorrectly
An incorrectly installed impeller is a common issue that may lead to water flow problems. Ensure the impeller vanes are bent in the correct direction during installation, as improper alignment can prevent it from creating the necessary suction. Double-check the orientation and consult the manufacturer’s guide to verify proper installation.
Blocked Intake or Cooling Lines
Another potential cause is a blockage in the intake or cooling lines. Debris, such as leaves, seaweed, or dirt, can obstruct the flow of water, reducing or completely stopping circulation. Inspect the intake screens and hoses for any physical obstructions and clean them thoroughly.
Damaged Pump Housing
A damaged or worn-out pump housing can also impair water flow. Cracks, pits, or excessive wear on the housing may prevent the impeller from creating adequate pressure. If you notice any damage or wear, replacing the pump housing or repairing it with suitable materials may be necessary.
Testing for Proper Water Flow
Once all components are inspected and reassembled, it’s essential to test the system. Start the engine and observe the water flow. If no water is visible from the cooling system’s outlet, shut off the engine immediately to prevent overheating. Reassess each component carefully and eliminate any issues before trying again.
Should I Use OEM (Original Equipment Manufacturer) or Aftermarket Impellers?
Choosing between OEM and aftermarket impellers can significantly impact the performance and longevity of your boat’s water pump. Understanding the benefits and drawbacks of each option will help you make an informed decision.
Benefits of OEM Impellers
OEM impellers are specifically designed to meet the exact specifications of your engine and water pump. They offer consistent performance, high-quality materials, and compatibility with your system. By using OEM parts, you can ensure optimal functionality and minimize risks associated with improper fit or poor workmanship.
Pros and Cons of Aftermarket Options
Aftermarket impellers are often more affordable and widely available, making them appealing for budget-conscious buyers. However, their quality can vary significantly between manufacturers. While some aftermarket impellers perform comparably to OEM parts, others may lack durability or precise compatibility, potentially leading to premature failure.
Long-Term Reliability Considerations
When evaluating long-term reliability, OEM impellers generally outperform aftermarket options due to their adherence to strict manufacturing standards. While some well-made aftermarket impellers may offer acceptable durability, they might not provide the same level of reliability as OEM alternatives, especially under demanding conditions.
Which Option Is Best for Your Boat
The choice between OEM and aftermarket impellers ultimately depends on your priorities, such as budget, availability, and desired performance. If you value consistent functionality and long-term reliability, OEM impellers are often the best choice. However, if cost is a major concern, carefully researching aftermarket options and selecting a reputable brand will help ensure good performance and durability.
Keep Your Engine Running Cool
Replacing your boat’s impeller is straightforward preventive maintenance that protects your engine investment. Regular replacement prevents costly overheating damage and ensures reliable operation when you need it most.
Schedule impeller replacement during your annual maintenance routine, and always carry a spare impeller kit during extended cruising. Your engine—and your wallet—will thank you for staying ahead of this critical maintenance task.

Ali
Ali Hassan is a seasoned SEO content writer with over 10 years of experience in crafting high-performing content for WordPress websites. Specializing in keyword-rich blog posts, landing pages, and service descriptions, Ali blends technical SEO knowledge with engaging storytelling to drive organic traffic and improve search engine rankings.